Friday, November 13, 2009

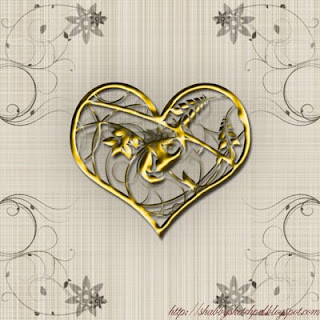
Digital Image: Heart of Gold


Seeing that I'm still in love with this theme, I post an image with similar vibe as the one I posted weeks ago. Shabby Victorian feel is a little addictive, like caffeine. This full photoshop-generated image is an expression of love. Well, of course, what with the heart and flower, can it express anything else? So ....

Background. Simple brush downloaded from Brusheezy, under the floral category. Or maybe swirly? Just click the brush anywhere you like. Even random clicks may get you a nice picture. What I did here was tampering with corner only. Try this: put swirls around the corner, duplicate layer, move to opposite corner, then flip horizontal. If you want the same pattern for each corner, just merge the two layers, duplicate it, move to opposite side, then flip vertical and merge the two layers.

Texture. This, I like. Because it's easy and can alter the whole appearance of an image. Create new layer, fill with color (I used BEAD90). Add noise and apply motion blur. You'll get a layer full of scratch lines. Duplicate the layer and rotate 90 degrees clockwise. Change blend mode of top layer to soft light. It will now look like a cross-hatched canvass. Merge the two texture layers and reduce opacity until you can see the background swirls.

Heart. Pick the heart shape from free shape, make path as selection, then make a stroke using black. Get the floral brush again and click randomly inside the heart. After you're done, tidy up the image a little. Erase any swirl that crosses over the outline.
Now we hit layer style. Apply drop shadow and bevel. Choose a smooth inner bevel and ring for the curve. Experiment with depth, size, and soften. Apply color overlay because we don't want a black heart. In this image, I use gold color (ffc900 or so). It's done. Looking nice and shiny. Everything a girl likes.
Friday, November 6, 2009

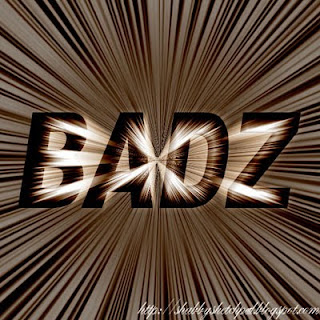
Digital Image: Badz (Text Effect)


For once, I wanted to do something about text. Simple font like Arial can look cool too. My first thought was to make the text looked like zooming fast. By using a couple of filters, this can be done. Before doing anything, we needed to make sure the canvass was a perfect square, because there would be a lot of rotating. Less than perfect square would make the end result a little weird.

First I typed a short word with Arial Black. Then I duplicated the layer and filled the duplicated layer with white on multiply blending option. I blurred it a little with 2 pixels Gaussian. At this stage, the text would look rather plain.

How to make it not so plain. Hit filter, find distort and find polar coordinate. Check the option polar to rectangular. See the difference? Rotate it 90 clockwise. Hit another filter. This time, it's stylize, the wind effect. Make sure to pick wind method and direction from left. Do this twice, then we'll have a bunch of scratch marks. Then hit Ctrl+I to invert the color. Do the windy twice, again. We'll have a blackboard with white scratches. That's fine. Rotate it 90 counter clockwise. Still not getting it, eh? Try the previous filter, polar coordinate. Pick rectangular to polar option. Now we're getting somewhere. For this layer, choose hard light for blending option. Adjust hue/saturation as you like. See? A lot cooler than simple type.

If it's still not enough, make another layer. Fill with white and add 100% Gaussian monochrome noise. Use motion blur with direction 90 degrees, and distance 200 pixels. Hit polar coordinate again and choose rectangular to polar. Again, pick hard light blending mode. See?
Oh, but text becomes unclear. We need to add layer mask on this and brush the areas we want to make clear with black. If the zoom lines is too strong for your taste, just reduce the opacity of the layer. Done.

Wednesday, October 21, 2009

Digital Image: My Banner (?)


I've just finished making a banner for this blog. Not saying that I'd use it anywhere, but still, there's some sort of a satisfaction when you made something that you liked. Although, it's not as pretty as I wanted, but it would have to do.

Fabric textures always interest me. So, when I made this image, I wanted it to look like a banner from an older era. Hence, the fabric. The color is a little dull and boring, but it's the color of common people. Bright colors and lush fabrics are only for royalty. Shabby Sketch Pad was created by common people for common people. See, people power. And because I'm sort of female, so the feel has to be sort of feminine. Hence, the flowers.
The tools are simple, just a few brushes, paint bucket, and filters. I downloaded the brushes from Brusheezy, free of charge. Making the background was fairly easy. I filled a layer with color, add some noise, and filtered with motion blur. Then I duplicated the layer, rotated 90 degrees CW, changed the blending mode, and merged. Voila! Instant fabric less than 2 minutes.
I made the text using Janee's photoshop tutorial for jelly text. But I overdid the Gaussian blur intentionally so the text wouldn't look too jelly-ish. Check out the other tutorials at http://www.myjanee.com/tutorials.htm! They are awesome and easy to follow. You don't have to be photoshop savvy to understand the instructions.

Sunday, September 20, 2009

Digital Image: Yoga Pose


Yesterday, I saw a group of people doing yoga in the gym. I wasn't a gym member, only a passer by. Anyway, one of the instructors who wasn't guiding the class did a pose which I thought only existed in ballet or gymnastics. It was a beautiful pose.

I made the background thinking about how yoga was a part of Indian culture. The image wasn't exactly accurate, because it's too geometric. But the pose was so fluid, I needed to balance it with a bit of angle. So by using a hexagonal shape, copy layer facility, and a move tool, the background pattern constructed itself.

The focus subject only consisted of a silhouette because sketching the exact feature of the person wasn't really my niche. I selected the subject, filled it with white with 30% opacity, added a bit of shading and highlight so it wouldn't look too flat. And with selection still active, I added a 2 pixels black stroke and a 3 pixels Gaussian blur.

Here's the result.

Sunday, September 13, 2009

Digital Image: Rose 2


This is the same rose as previous post. I only made a few changes on the vines. This new one had more floral feel to it, compared to the last one. I don't know, more sword-n-shield vibe?

I made the outlines using Corel's pen tool because of its newbie-friendliness. So were the vines. Only this time, I chose artistic pen. You can even write calligraphy with the artistic pen. Don't know where to find the tutorials though.

I filled the color on photoshop, as usual. The effects were not layer style, only simple filters. Lighting rendering as usual. Some friends told me that the lighting filter only adjust ... well, the lighting effects and none of the bevel effect. Here is the cheat code: use channel. Yup, load your image as selection and create new channel. The result would be a black background with your selection. Fill the selection with white. New channel would be named alpha. Copy alpha channel layer. With selection still active, apply gaussian blur filter with any value you want as long as the image still has definite form. Invert the selection and cut background. Go back to layer tab. Create new channel and fill with any background color you want. Go to filter > render > lighting, and pick the channel alpha copy. The preview window should show an relief-like image, like your original picture was carved there. Apply the filter. Back to original pic layer and load it as selection. Go to the layer with lighting filter on it. Invert selection and cut background. The result should have similar effect to the image above.

Sunday, September 6, 2009

Digital Image: Rose GIF


I saved this rose image in GIF format, so it would be alright to place on a web page. The file size is not too large, methinks.

The rose was created using pen tool in CorelDraw. With Ctrl+Q to convert lines to curve, I could manipulate the initial sketch into forms I wanted. Even the swirly lines were not difficult. To copy the object to their exact opposite, I just needed to drag it to the other side while holding Ctrl key, then right-clicked on the desired position. Instant flip. No need to copy layer, and then flip in from Edit menu. But that's just photoshop for you.

Still, photoshop has the advantages of colors. Really beautiful colors you can pick with only an eyedropper. And pretty textures you can custom-make. Some of the awesome effects are only a click away using filters or layer styles. I only added noise and a little lighting rendering for this rose image.

If you know flash, this image can be made into a button. At least, the rose can. Maybe I'll try to make a button with it.

Thursday, September 3, 2009

Digital Image: Jewel

After being a bit down yesterday, I'm kind of content with this image. Quality-wise, way better than previous upload.
This is also fully digital, but with a lot of help from free tutorials around the net.
I think it's kind of pretty. Shiny, at the very least.

This image is all filter and a lot of blending style. I hope I can remember all of it. The tutorial is a little difficult for me to follow.
But I manage to do some changes from the original tutorial, like using fleur-de-lis instead of butterfly in the middle of the gem.

The background was easy though. I just used black filling, layered by blurred white circle. The swirly pattern could easily be found on the net. I only applied lightening filter to make the "pearls" stand out.

Wednesday, September 2, 2009

Digital Image: Landscape


This is getting ridiculous. The more I practice, the more I degrade.

I was going for a natural look. See? Natural, as in reddish afternoon sky. Not this forbidding gates of hell.

Next thing I know, I'd give up going digital and stick with the pencil and charcoal. At least, I have better control of my hand. Drawing with a mouse is harsh. My hand kept getting tangled with the cord. I clicked at the wrong places. Then the computer shut down.
I'm at my wits end.

So, on with the image. Fully photoshop. Tools: brush and smudge. Filter: noise and blur and lightening. Oh my.
That's it.

Saturday, August 8, 2009

Digital Image: Tree in Winter


I am like that tree. Fresh out of leaves, fresh out of ideas.
Purely photoshop work.
I browsed my collection of photos and found a few images with trees in them. This one was the easiest to trace. Other trees had leaves.

I used polygonal lasso to trace the edges, then filled it with gradient. With selection still active, I filled a new layer with white, then another layer with black. I moved the selection a bit to the right and deleted a part of the white paint. Then moved the selection to the left and deleted the black one. Shading and highlight done.

I made the shadow using a layer copy of the tree image, and filled it with black, flipped vertical. From edit menu, I used transformation -> skew, then, well, just skewed it from side to side until I got the shadow position I liked.

Background was done in less than 5 minutes. I filled the bottom layer with black, added a new layer on top of it and paint the ground using soft edge brush.
I made the snow also with soft edge brush but added scatter and jitters (size and opacity) on brush preset menu.
Done.

Sunday, July 19, 2009

Digital Image: Simple Flower


I really don't like drawing flowers. But it is a must-draw object. So at least I have to give it a try.
Just like back in third year art lesson. I used color pencils back then.
This image does not look like color pencil sketch. I wanted to make it like hand drawing. Apparently I failed.
This is purely photoshop-generated. I only used brush and smudge tool. It's tidier than my nine years old self's scrawl.

Monday, June 22, 2009

Digital Image: Carol Singer


This is practically the first ever humanoid image I've made using only digital means. Most of my pictures are based on hand sketches.

First, I used Corel Draw to make the outline. I'm not an educated graphic designer, so I won't know about any special feature in that software, hence, the usage of only a simple pen tool. It's kind of easy too. Not as complicated as Illustrator, I'll never get the hang of it. The pen tool can only draw straight line. That's why I have to continuously press Ctrl+Q to create a curve. It's still time-consuming for me, despite the simplicity of said tool.

Then I painted the colors with Adobe Photoshop. Also only using fill option and gaussian blur. Very simple procedure that anyone can do. Shading and highlighting are still a mystery to me. See?

Sunday, May 31, 2009

Little Princess


I made these images for my niece. She's three years old now. She loves playing dress-up as a princess. My cousin asked me to compile her photos and create a fantasy-like collage. I didn't know what people consider as fantasy, so I gave my best shot.

The first image was easy. I just piled a photo of some clouds on top of my niece's larger photo, and changed the opacity of the top layer until I was happy with the result, and then I merged both layers. I shrunk the other eight pictures of her and add some layer masks and painted some black on the edges with an airbrush. Done.

With the second image, I used more care to create the apples. Here, I compiled four photos. One was still in the actual size, the other three I shrunk. Same basic layer masks addition to soften the edges. After all the photo layers were merged, I pasted the apple image I made in another window to a new layer. Adjusted the size, then copy-pasted it until I had my border consisted of apples. Done.

The third image only used one photo and three pumpkin carriages. I erased the background of the photo and placed it in the middle of the canvas. I added some background color with gradient fill. I already made the pumpkin carriage picture and only changed the size and color for this collage.

The steps were simple for a professional graphic designer. Not for me. I spent days working on these. But it's all for my niece. Now she can happily show off her charm on her father's YM.

Saturday, May 30, 2009

First Sketch with Digital Paint

I made this image just yesterday. It's based on my first sketch from the previous post. I kind of skipped the tracing step, and went straight to painting. Alright, the painting was basically only filling the blanks with paint bucket tool. I'm still not brave enough to erase the outline.

The result is so very flat. I don't really have the ability to shade and highlight images, but will try, though. Will try the hardest. Hopefully it can be better. More 3D-ish. I'm a bit happy with red color on the heart. Very simple to make, too. I only use gaussian blur for the shade and highlight. No idea what to do about the wings. How do you make some wispy effect? Wispy is good for wings. Maybe airbrush from the brush preset with additional spatters can do the trick. This is the time to experiment ....

Wednesday, May 20, 2009

Digital Image: Rose


At first I only wanted to make a simple line art image from Beast's rose. But the result was not really satisfying. It was plain. Granted, the first one was a white-on-black.

I loaded the image selection, did an inversion of said selection, and filled it with red. I ended up having a red ink blot with gaps all over the place. But from my point of view, the current result has more character. I kind of like this one better. I added some white and a bit of maroon to give it a more three-dimensional look. The background was the easiest. It started with a depressing gray, then with a pinch of filter (noise and lightening effect), it turned out not so depressing after all. The sparkles, I shamelessly ripped them off from Beauty and the Beast.

Tuesday, May 19, 2009

Kiddies Sketch

I made this drawing for my niece last valentine. I never really thought about what I drew. Only now I realize, the sketch might imply inter species love relationship and an Easter bunny without the eggs. And the girl has a fox dolly. And they all live happily over the rainbow. Talk about psychosis of the craziest order.

The sketch was drawn on an A4 paper, using pencil and black ink. Ballpoint, not drawing pen. I can't think of the color scheme. Pink is definitely a must and the bear should be brown. Other than that, I haven't got a clue.

Friday, April 24, 2009

Sketch of Mermaids


I don't remember what I was thinking when I drew this. Only that my little sister whined about a Barbie movie, ... Mermaidia, I think. She's obsessed about Ariel too. Probably because of her voice.

The sketch is a bit messy. I don't have drawing pen, so I have to use ballpoint pen. The result is not so good. But, at least, the whole paper is not filled with white correction fluid. Ballpoint pen ink does not bleed. I never can get the clouds and water. My hands are not natural enough for it.

Still haven't found a faster way to trace my drawings with the computer. And most people say digital art is easy. Maybe I'm just dumb.

Monday, April 6, 2009

First Sketch on Blog


This is an inked sketch using black ballpoint. The inspiration came from Cardcaptor Sakura. She had this backpack that was heart-shaped with little wings on it. Most of her things had this symbol. Don't know what it means though.
Want to color it with photoshop. But first, need to find a way to trace this fast like.

Thursday, March 26, 2009

Shabby Is Good


Since I was a little girl, I've always dreamed of becoming a famous artist. My paintings would be showcased and coveted by many a renowned galleries. My name would be written in history in gold ink and a hefty amount of flourish. But alas, it is not to be.

As my love for drawing and painting never falter, I've wasted hundreds, maybe even thousands sheets of paper to contain the carbon bits of my pencil. The collection grows over years. Some I need to throw away, the torn ones, the hated ones, even the unfinished ones. It is my silent prayer that someday my skills would develop and people would say that my drawings were good. Hopefully. I am still crossing my fingers. The sketches are still as shabby as ever. I mean, not shoddy workmanship, only the results are almost never as pretty as I hope. But, all is good. This little woman is not giving up. Don't care if it takes half a century, but I will reach that goal. And, hey, with the new digital imaging technology, maybe my goal won't be too impossible.